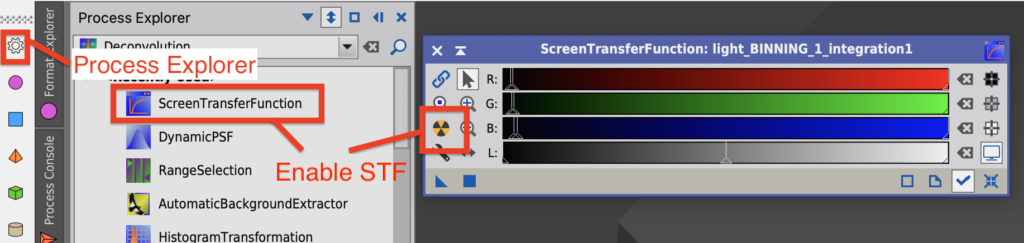
I use PixInsight for image processing.
When I started astrophotography, a Chilean friend who I met while observing the total solar eclipse in Chile told me to use a software called PixInsight.
PixInsight is, in a word, Doraemon’s four-dimensional pocket. There are a lot of tools, and their uses are quite similar. However, even for the same movement, the concepts are slightly different, such as “Anywhere Door” for going directly, and “Takecopter” for looking for people, and people have their own preferences on which functions to choose. Therefore, each person will have his or her own processing procedure.
- WeightedBatchPreprocessing (WBPP) – Pre-processing
- Linear and non-linear stages – Post-processing
- AutomaticBackgroundExtrator (ABE) – Background model creation)
- Check the image with STF Auto Stretch (boosted)
- DynamicCrop – Crop an image
- PhotometricColorCalibration – Color calibration
- HistogramTransformation (HT) – Stretch
- HDRMultiscaleTransform – Enhancements to the dynamic range
- RangeSelection – Creating Mask
- CurvesTransformation (CT) – Adjusts the colors of the galaxy.
- TGVDenoise (TGVD) – Reduction noise
- SCNR – Remove green noise
- HistogramTransformation (HT) – Finalizing the image
WeightedBatchPreprocessing (WBPP) – Pre-processing
In November 2019, WBPP was introduced as an evolution of BPP, a tool that automatically determines the quality of an image and weights it. In the past, BPP was used for pre-processing, but now that WBPP has become more stable, we decided to use WBPP in the basic flow as well. PixInsight processing is divided into pre-processing and post-processing. PixInsight’s processing is divided into pre-processing and post-processing, and the pre-processing, such as noise reduction, various corrections, image weighting, and image superimposition, can be completed with the touch of a button. WeightedBatchPreprocessing is hidden under Script – Batch Processing in the menu. It is a mystery why such an important process is hidden in such a place, but let’s start it anyway.

Just use the Add button at the bottom to add Bias, Dark, Dark for Flat, Flat, and Light frames, set the Output Directory as the output destination, and Run. The great thing is that it automatically sorts the exposure time, filter or not, etc. It is easy to use, but there are a few caveats.
(1) Check Generate subframe Weights.
By checking this box, you are evaluating and weighting the image, which is the main function of WBPP. If you don’t check this box, you can’t start… but it also makes the process very slow. There is also a way to use it as a “convenient BPP” by not checking it.
(2) Check Force images measurement
WBPP evaluates the values of FWHM, Eccentricity and SNR. These values are also stored in the FITS file, but by checking them, the information in the FITS file is ignored and replaced by the values evaluated by WBPP. Since you have evaluated them, you should check them.
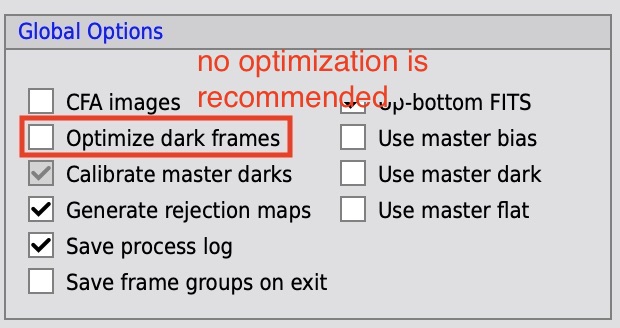
(3) Do not use Optimize dark frames and shoot Flat Dark.
In WBPP, if you set a dark frame with the same exposure time as the flat frame, it will automatically be used as the flat dark frame. In addition, there is a function called “scaling” that allows the same Dark to be used for both Flat and Lights. To use this feature, check Optimize dark frames in Global Options. However, we do not recommend using this feature as there have been some reports of noise being generated.
Translated with www.DeepL.com/Translator (free version)
Also, when using Flat Dark, check the Calibrate with flat darks option that appears in the Flat tab.
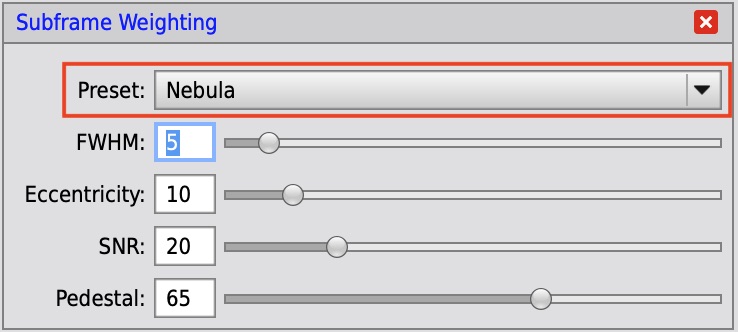
(4) Preset of Weighting parameters
In the Subframe Weighting section of the Lights tab, click on →Weighting parameters…. in the Subframe Weighting section of the Lights tab to enter the weighting parameter setting window. Select Nebula, Galaxy, Clusters, etc. for each target object in Preset.
(5) Avoid grouping images with close exposure times.
When shooting with Flat Dark, you may have images with close exposure times, such as 2 seconds and 5 seconds, and you may also have images with close exposure times when using multiple exposures. Exposure tolerance is a setting that allows you to combine images with less exposure difference than a numerical value into a single image. For example, if you want to separate images with an exposure difference of 3 seconds, set Exposure tolerance to 2 or less.
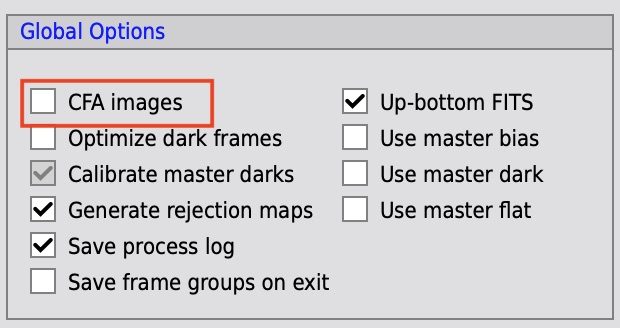
(6) Set CFA for color images.
For color images, check the CFA images checkbox in the Global options. For monochrome images, it is unchecked.
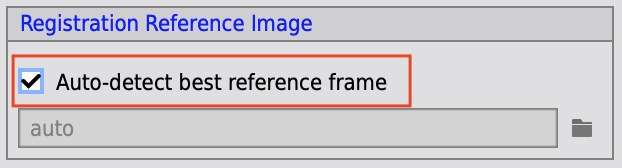
(7) Auto-detect reference frame
To automatically select an image as the basis for alignment, check the Auto-detect best reference frame checkbox in Registration Reference Image. The interesting thing is that this does not select the best image, but only the best image for alignment.
We have found that some FITS files do not show the correct colors after integration. In this case, change the Debayer/mosaic pattern in Lights from Auto to the Bayer pattern of the sensor you are using. In this case, changing the Bayer Pattern to RGGB of the sensor of the ZWO ASI294MC camera resulted in the correct colors.
Linear and non-linear stages – Post-processing
Now it’s time to start the post-processing (…well, I did almost nothing pre-processing, thanks to WBPP). First, let’s take a look at the target image: under the Output Directory specified in WBPP, a file named light-BINNING_1.xisf has been created under Masters, so double-click it to open it in PixInsight.
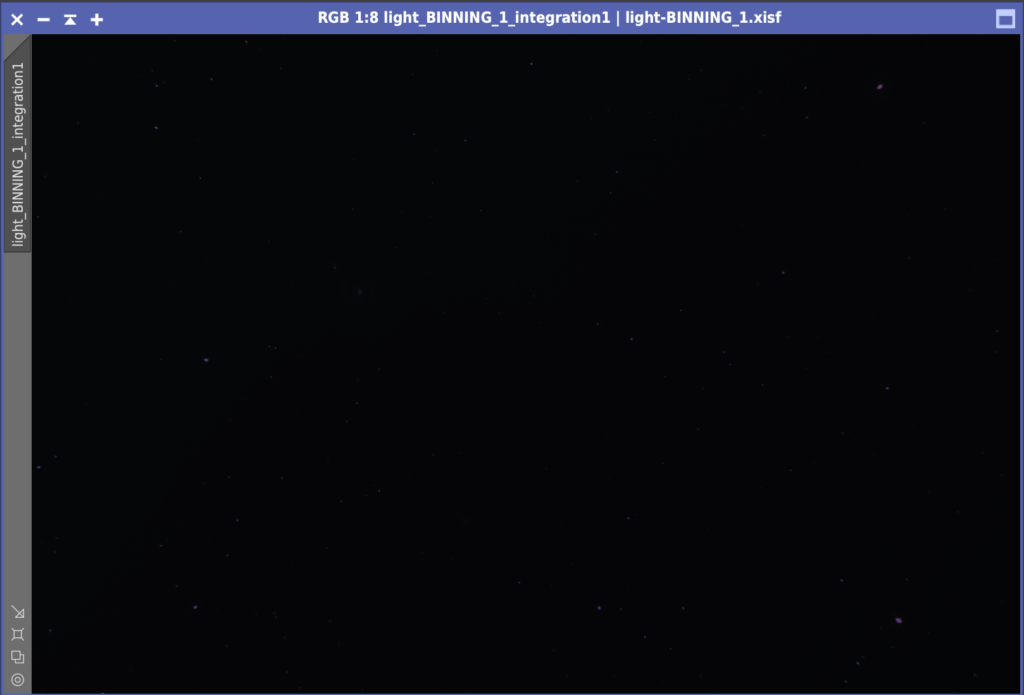
Then, lo and behold… nothing is visible. The first picture taken with a digital camera is so dark that it looks like there is nothing in the picture. The stretching process described below is used to enlarge the bright areas and make them visible. JPEG data from digital cameras undergo stretching processing in the digital camera itself. PixInsight’s post-processing can be roughly divided into before and after stretching. PixInsight’s post-processing is divided into two main stages: before and after stretching, the linear stage and the non-linear stage.
Since the linear stage is still dark, it is hard to know if the processed result is working. The STF will help you many times in the linear stage.
By pressing the yellow and black buttons on the left, you can see the image automatically stretched. The important thing to remember here is that the image is only stretched in appearance, and no processing is done to the original image. This allows you to proceed with the non-linear stage processing while viewing the stretched image.
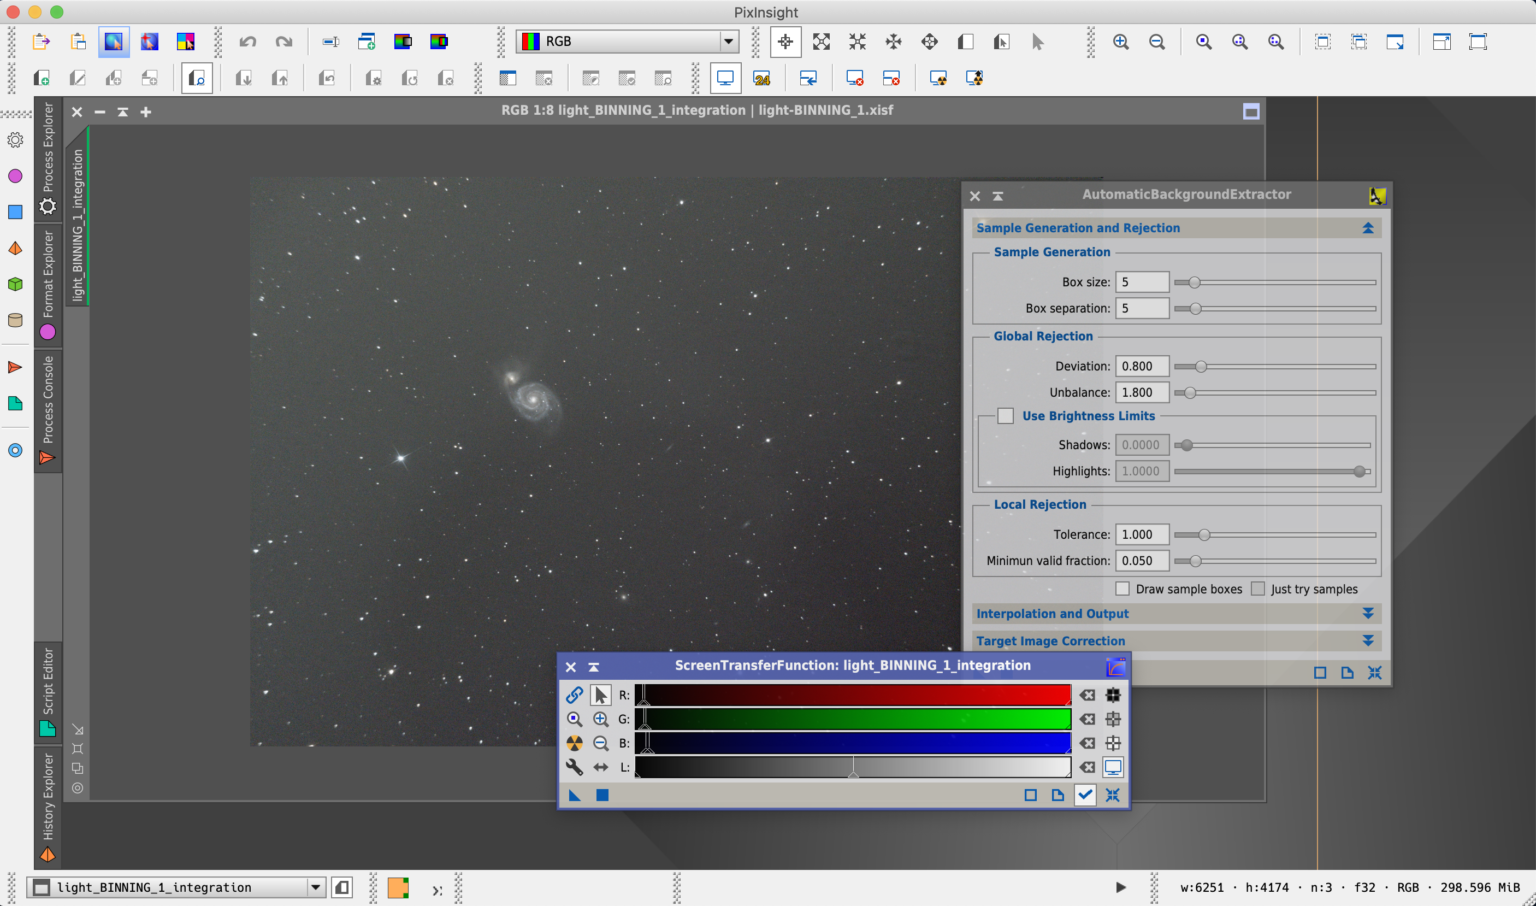
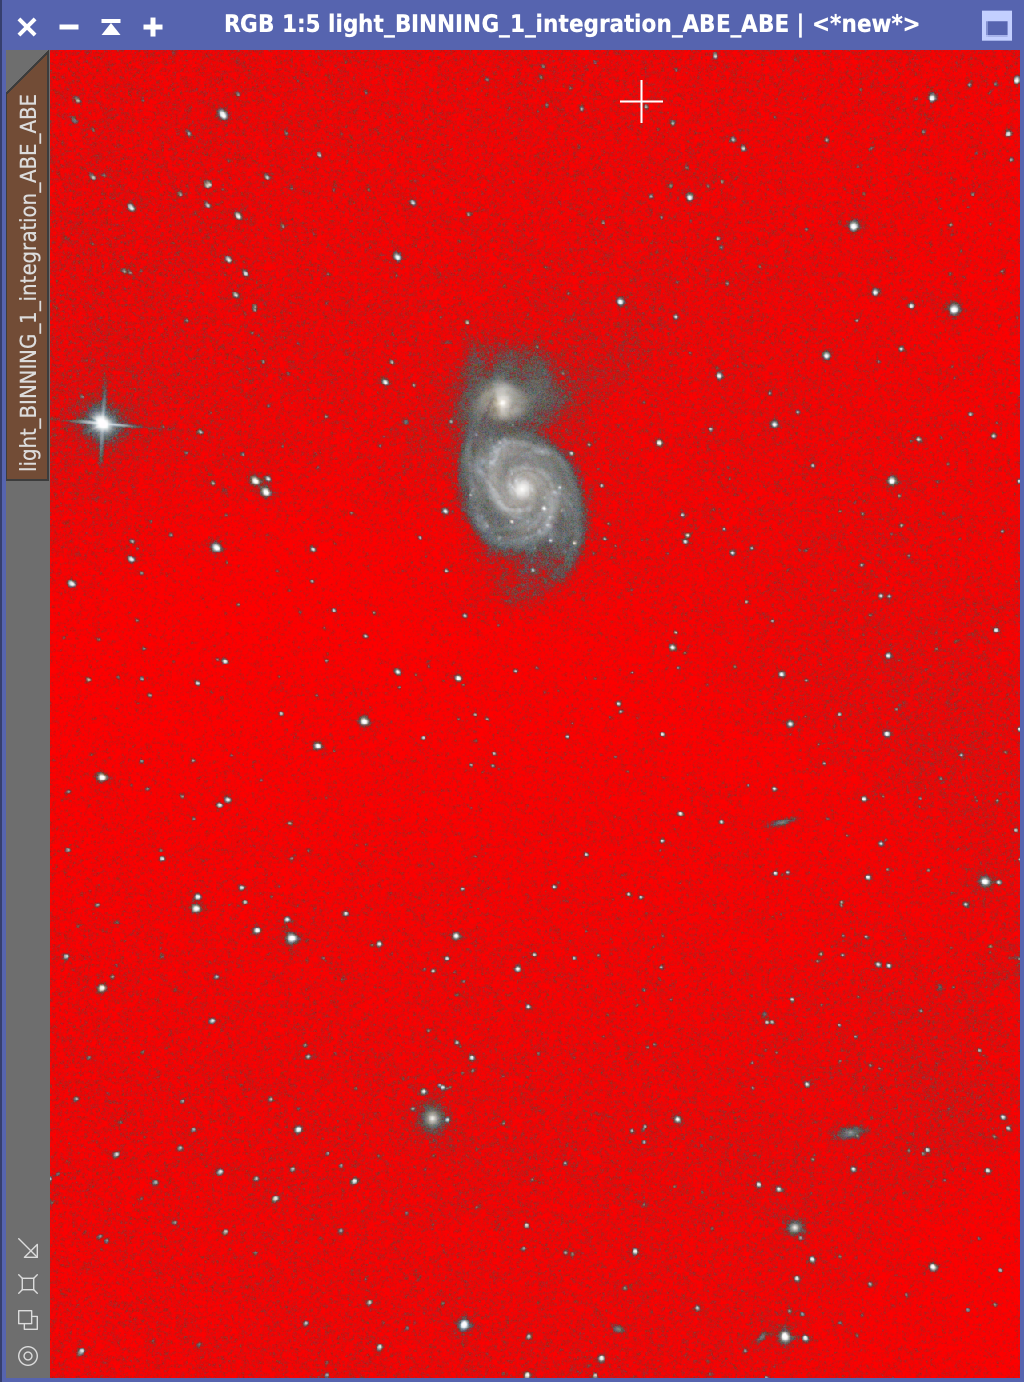
AutomaticBackgroundExtrator (ABE) – Background model creation)
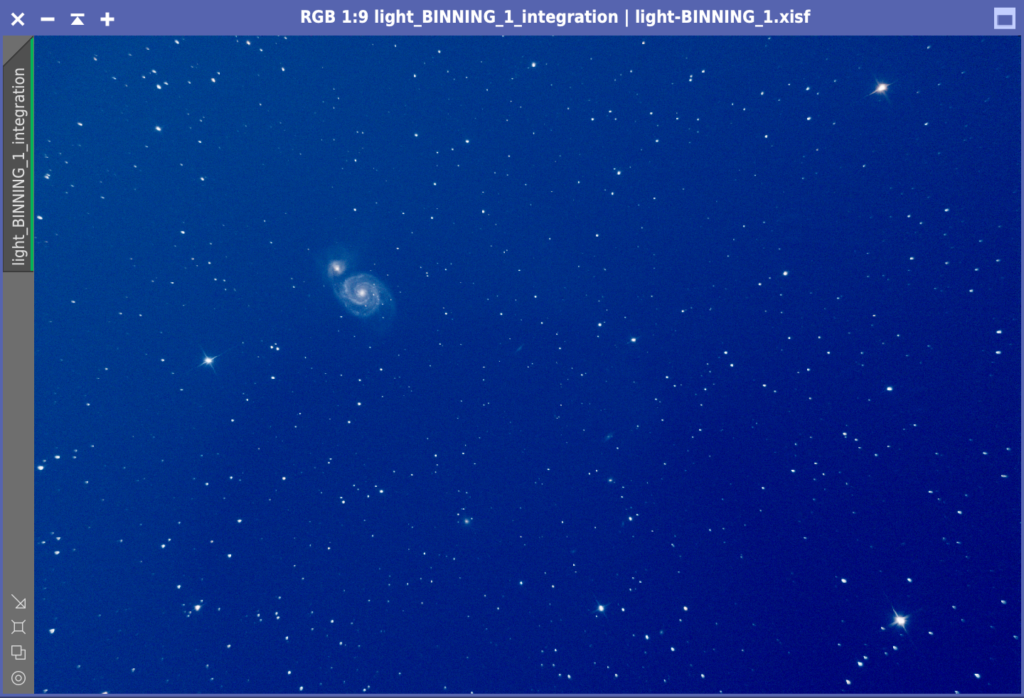
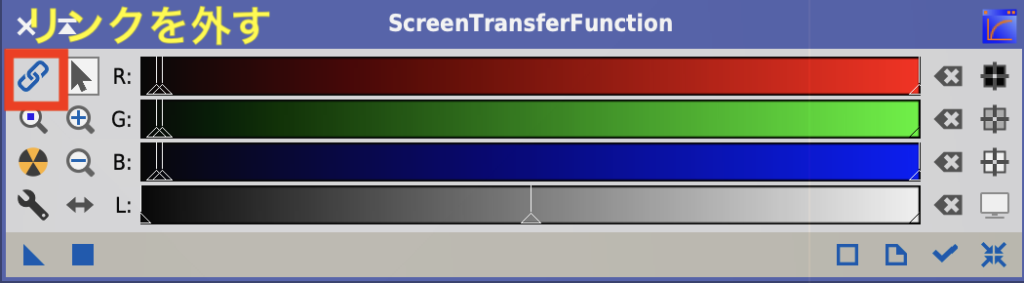
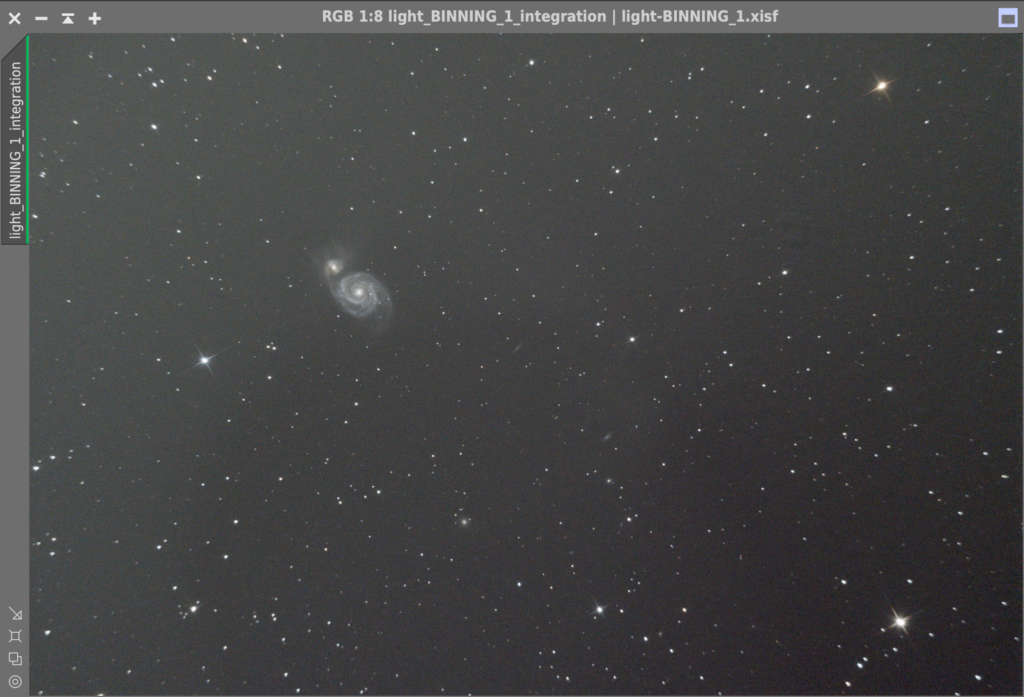
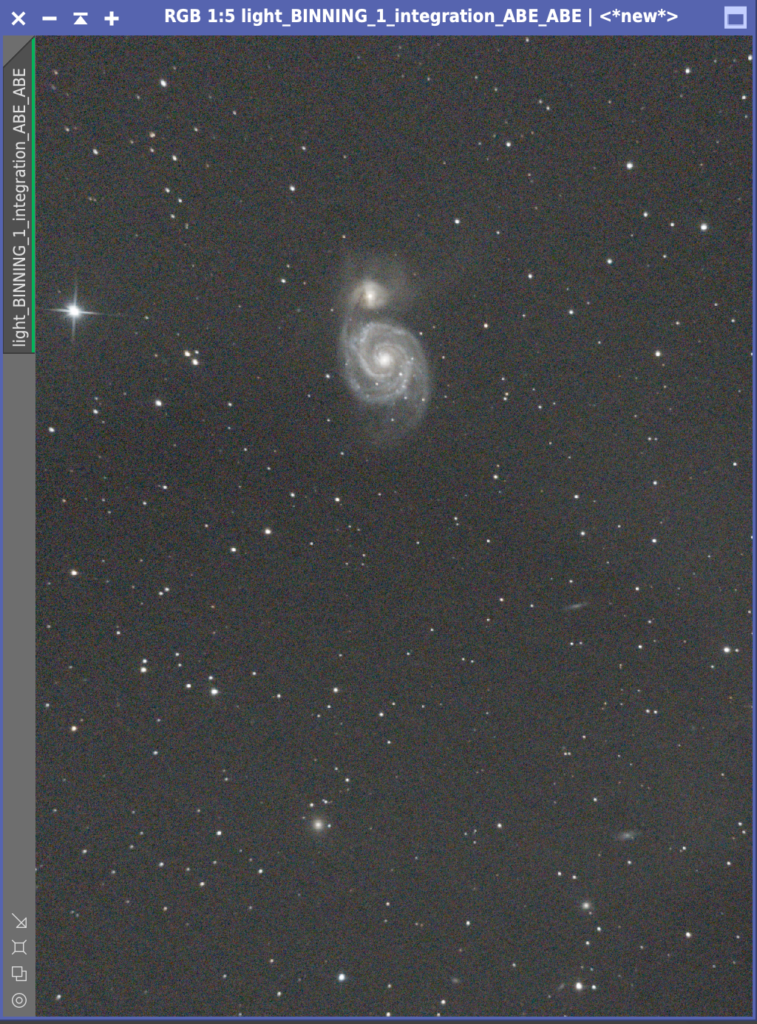
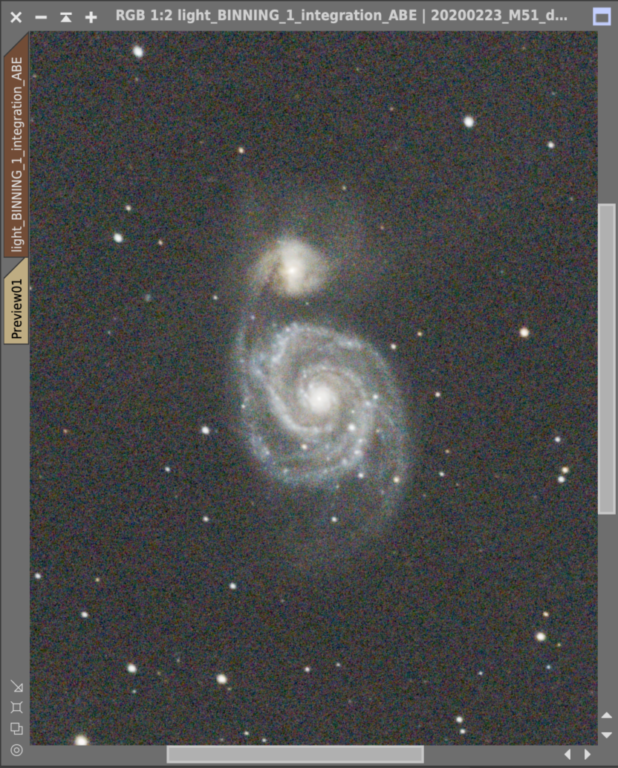
This is a pre-processed Light Master with Auto Stretch by StretchTransferFunction (STF) (Auto Stretch is a yellow and black circle). (Auto Stretch is marked with yellow and black circles.) The blue color is because Color Calibration has not been done yet, and by unlinking STF, RGB will be stretched separately, so it will be easier to see. Let’s run it.
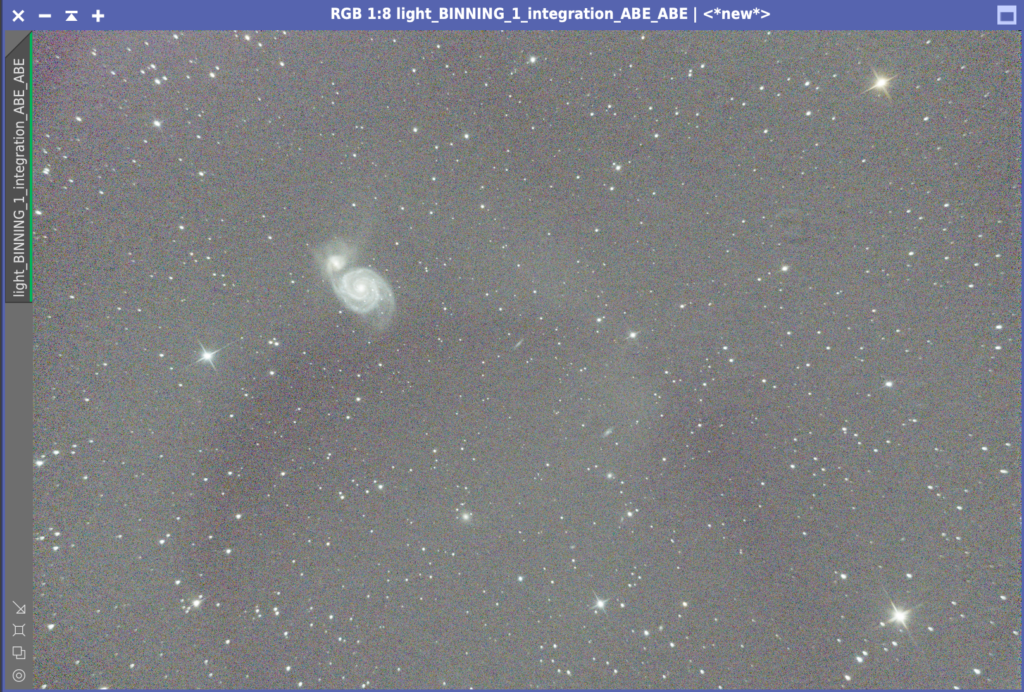
The upper left corner is bright. This is the direction of the ground to the north. It was taken near the coast of Jōgashima at the end of the Miura Peninsula, so there is some light from the skies over Tokyo and Yokohama. The total exposure was only 30 minutes, so there is no denying that there is a lot of noise. Let’s start with an image with various problems, making the boring excuse that we can learn how to use PixInsight better with such images. By the way, this image is the first celestial object I took with my telescope.
First, let’s correct the background. The first step is to correct the background. Many people on the net seem to use DynamicBackgroundExtractor (DBE), but I try AutomaticBackgroundExtractor (ABE) first, and when ABE doesn’t work, I try DBE.
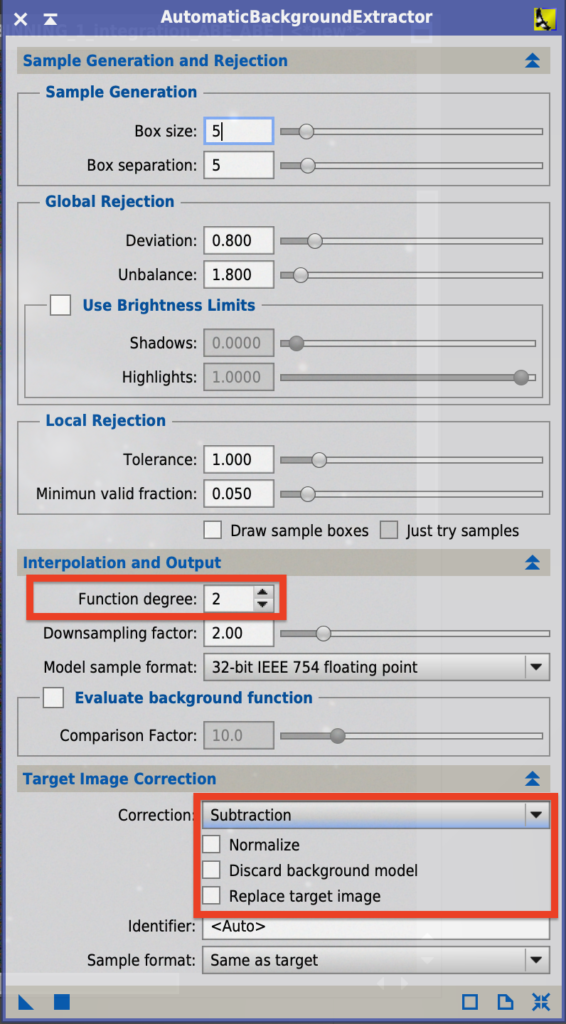
The main setting is Target Image Correction.
- Subtraction/Division… It is said that Subtraction is used for light pollution removal and Division is used for vignetting correction. I tried both and used the one that worked best for me. My feeling is that Subtraction is more flamboyant.
- Discard background model… If unchecked, it will delete the background model data, but it is usually not checked because it is better to see it.
- Replace target image… It does not create a new model, but replaces the original target. I have unchecked this option as I want to try it a few times.
You can also decrease the Function degree to make faint objects that are hidden by bright ones stand out. The default value is 4, but it is worth trying 2 if you want a more subtle effect. In this case, I left the default setting at 4 because of the significant light pollution effect. If you apply STF to the background model, you can see the effect clearly. Recent experience has also shown that setting Function degree to 1 is also very effective when light pollution has a large effect.
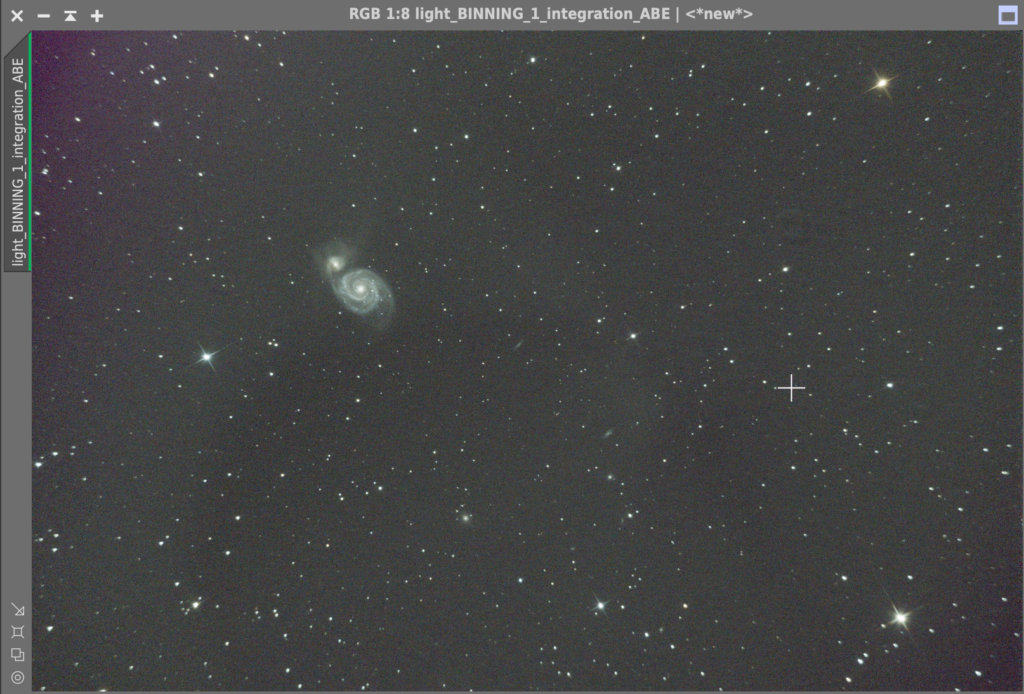
Here is the result. You can still see the light in the upper left corner. ABE can be applied twice! Some people also use the technique of running Division first and Subtraction second.
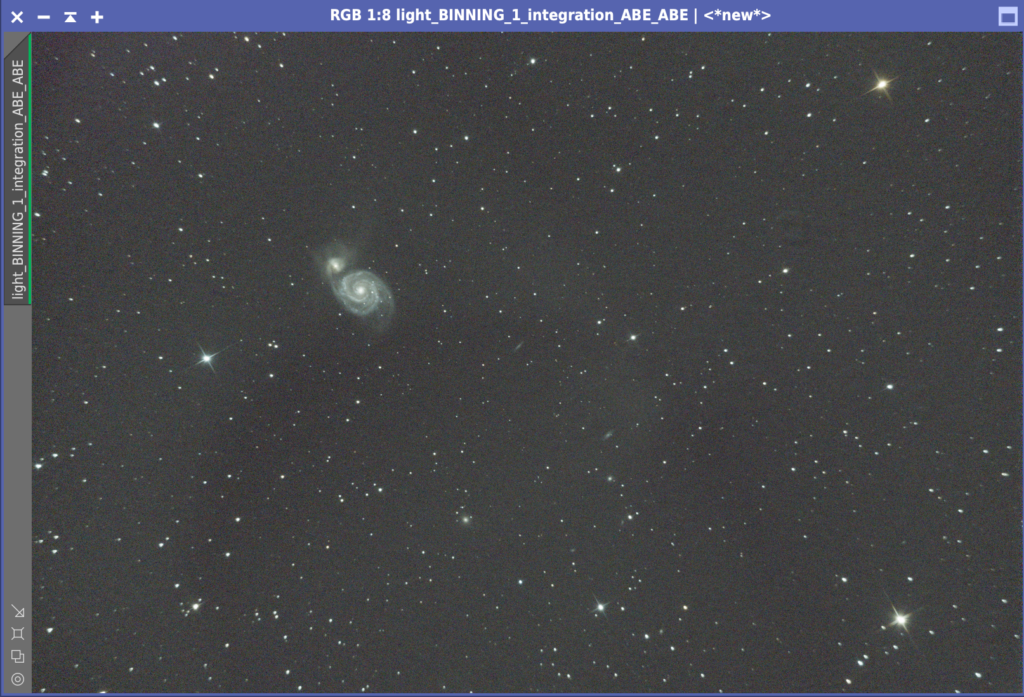
It’s pretty clean now. Let’s also take a look at the background model.
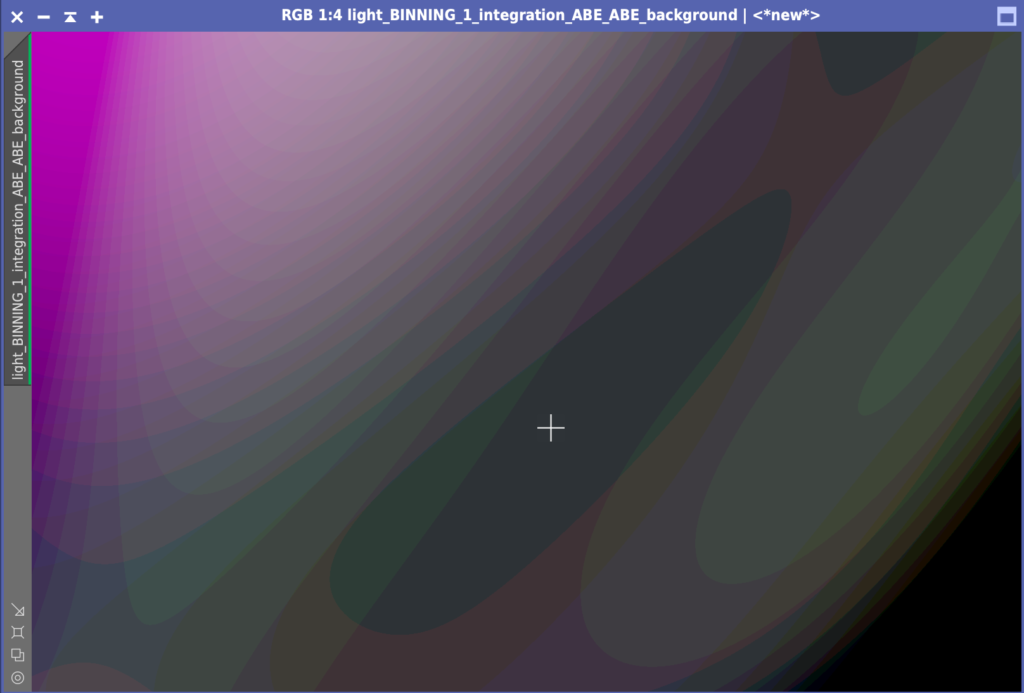
What the hell is this? Hi, ABE-san. I’m sorry for the trouble. Thanks to you, I’m all clean now.
Check the image with STF Auto Stretch (boosted)
Images are usually checked with Auto Stretch in STF, but Auto Stretch (boosted) is also useful. You can also use Auto Stretch (boosted) to check for unwanted noise or stripes in the image due to overlapping, and make a plan for further processing. In this case, there is a lot of haze in the background. I’m a little concerned about this, but I’ll move on.
DynamicCrop – Crop an image
My Vixen R130Sf is 650mm, which is not a very long focal length. I bought this telescope to look at the moon, Saturn, and Jupiter, and it was originally mounted on a telescope stand. I don’t have the skills to use a long focal length telescope yet, so I’m planning to have this Vixen work for me for a while. So I cut it out! Let’s cut it out. I used DynamicCrop to cut it out.
Actually, there is one more problem: the image is not facing north… They usually put north up unless they have an intention to do so. It’s easier to compare it with other people’s photos, and more importantly, it makes me uncomfortable. So, let’s rotate it.
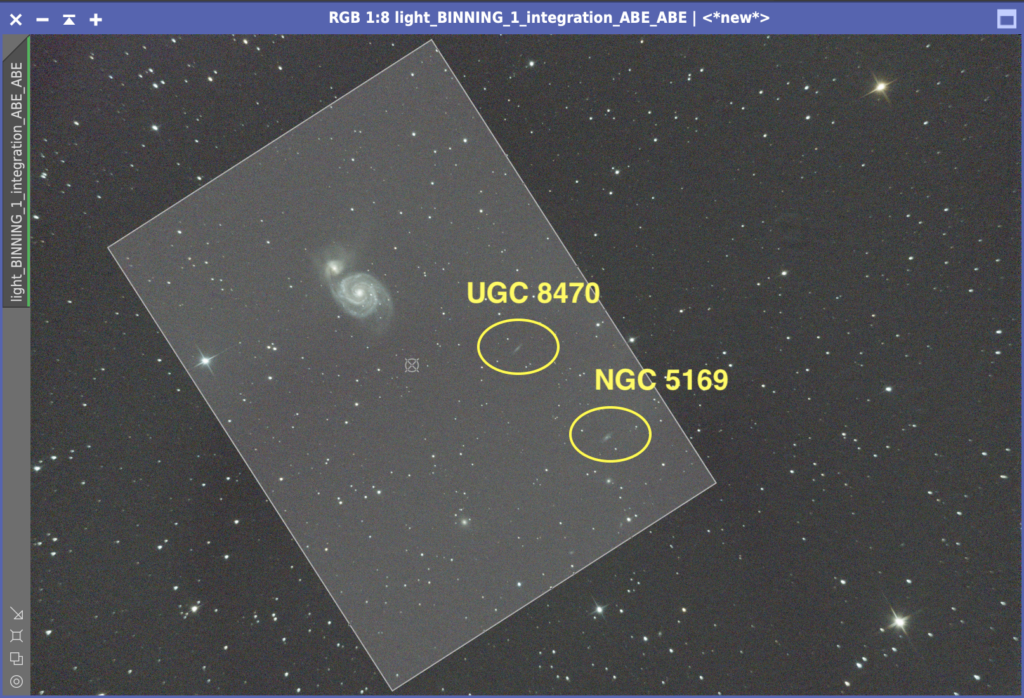
While checking the image, I noticed two small cute galaxies below M51. I’m going to cut them out and include them in the image.
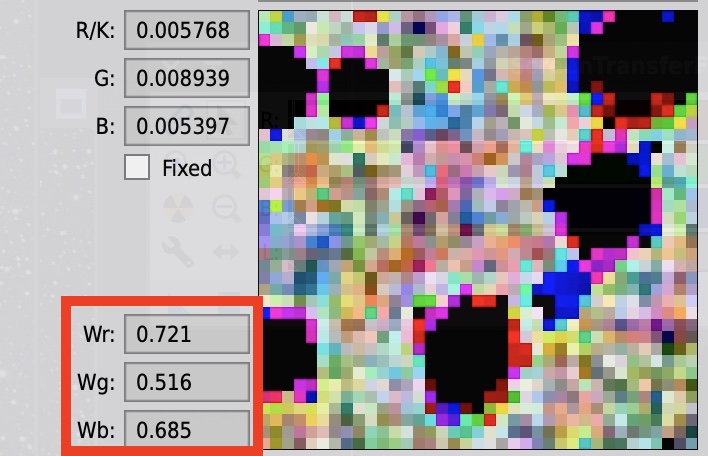
PhotometricColorCalibration – Color calibration
The next step is color matching. The current image uses STF’s Unlinked Stretch to get a color that looks like that, but when I link it, it’s blue. I haven’t adjusted the colors yet. The principle of PCC is as follows The principle of PCC is described in the PixInsight Tutorial. This is a very snarky and enthusiastic article, which says “Our philosophy is to have a set of documented standards to preserve natural colors, leaving no room for arbitrary processing” and “natural colors based on human visual characteristics adapted to sunlight. I can feel the depth of thought that goes into PCC. Please refer to the explanation of PCC in this tutorial.
What the PCC does is to determine the color by statistical processing based on the All Sky Survey (APPAS) data from an American organization called AAVSO.
Now let’s start PCC.

- Enter Right ascension and declination… Enter the right ascension and declination of the photographed celestial object, using the Search Coordinates function. In this case, I used M51.
- Observation date… Observation time. Acquire from Image is also easy.
- Focal length… Enter the focal length of the lens.
- Pixel size… Enter the pixel size of the image sensor.
Calculation of pixel size
The pixel size of a camera can be easily calculated. The first thing to do is to check the size of the image sensor of your camera on the Internet. The size of the image sensor of my Fujifilm X-T30 camera is 23.5 mm (width) and 15.6 mm (height). Next, let’s look at the number of pixels in the image sensor. 6240 (horizontal) and 4160 (vertical) are lined up.
Then the pitch can be calculated as follows.
Width: 23.5(mm)/6240×1000=3.77(μm)
Vertical: 15.6(mm)/4160×1000=3.75(μm)
In this case, we used 3.75 for the vertical. It is assumed that this is to calculate the size of the image when matching stars, so if it is approximately correct, it will be judged.
To increase the number of stars used for alignment, decrease the value of Log in Advanced Plate Solving Parameters. Move the slide bar to the left to decrease the value. You can also apply noise reduction.
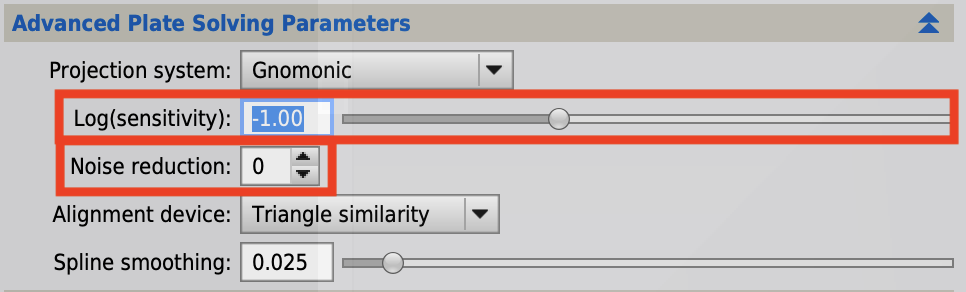
When Plate Solving fails, the method I take is to do a DynamicCrop. As a rule of thumb, if you resize the image using DynamicCrop, Plate Solving usually works.
The last setting is Background Neutralization. This will make the background neutral. Neutral means that the background will be a colorless gray, not reddish or bluish.
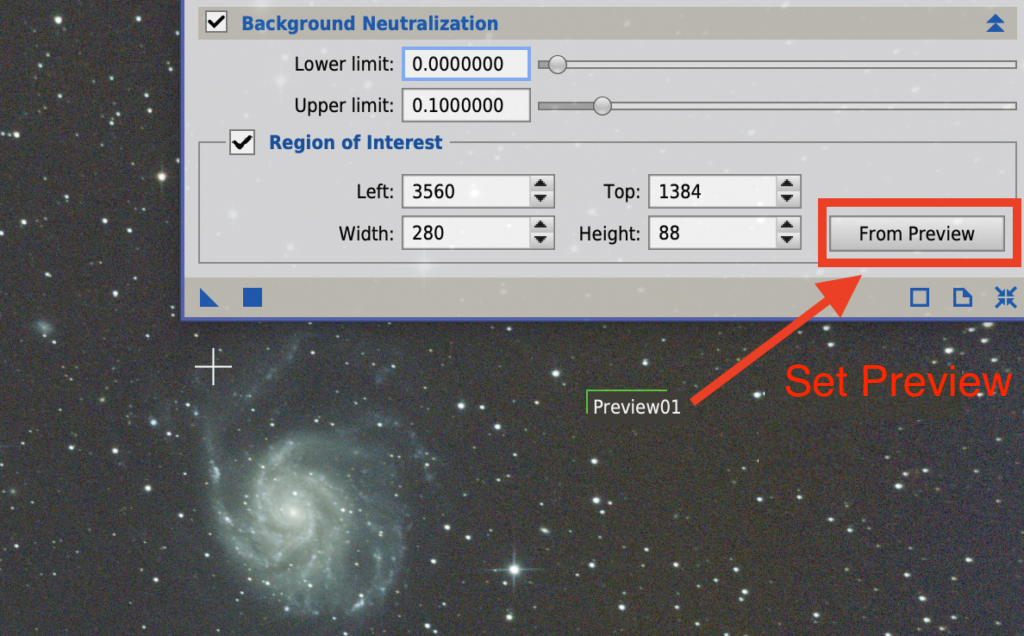
Select a background that does not contain stars or interstellar matter and create a small Preview. Then, click the From Preview button to set the Preview you just created.
The settings are now complete. Now let’s run it by pressing ■.
The process has been completed successfully, and the correct colors are displayed even with the STF link. Now that the color balance is correct, please turn on STF linking in the future. It is also quite common to get errors in PCC. In this image, the PCC error occurred in the large image before cropping. The error may disappear by cropping the image, or by specifying a different celestial body when entering the position, as in this case. If the error persists, I have no choice but to manually perform ColorCalibration.
HistogramTransformation (HT) – Stretch
Now, it’s time to move on to the non-linear phase. Up until now, linear processing has been a straightforward process that PixInsight can handle to a certain extent, but with non-linear processing, there are an infinite number of processing methods, and the skills and hobbies of the person involved come into play. In other words…
- As I was doing it, I got excited, and then I realized that the images were too flashy…
- It’s getting harder and harder to know what’s right, and when you look at it, it’s cleaner than before.
- I thought it was done, but when I looked at the image on my smartphone, the image was different…
It is a horrible process to get lost. Nevertheless, be brave and Go!
First, let’s move the information from the STF to the HistogramTransformation (HT), which is a stretching tool. In PixInsight, the ▲ mark is full of setting information, and in BPP, we saved the ▲ on the desktop. In PixInsight, the ▲ mark is full of setting information. Don’t forget to press the link button so that the colors are already matched.
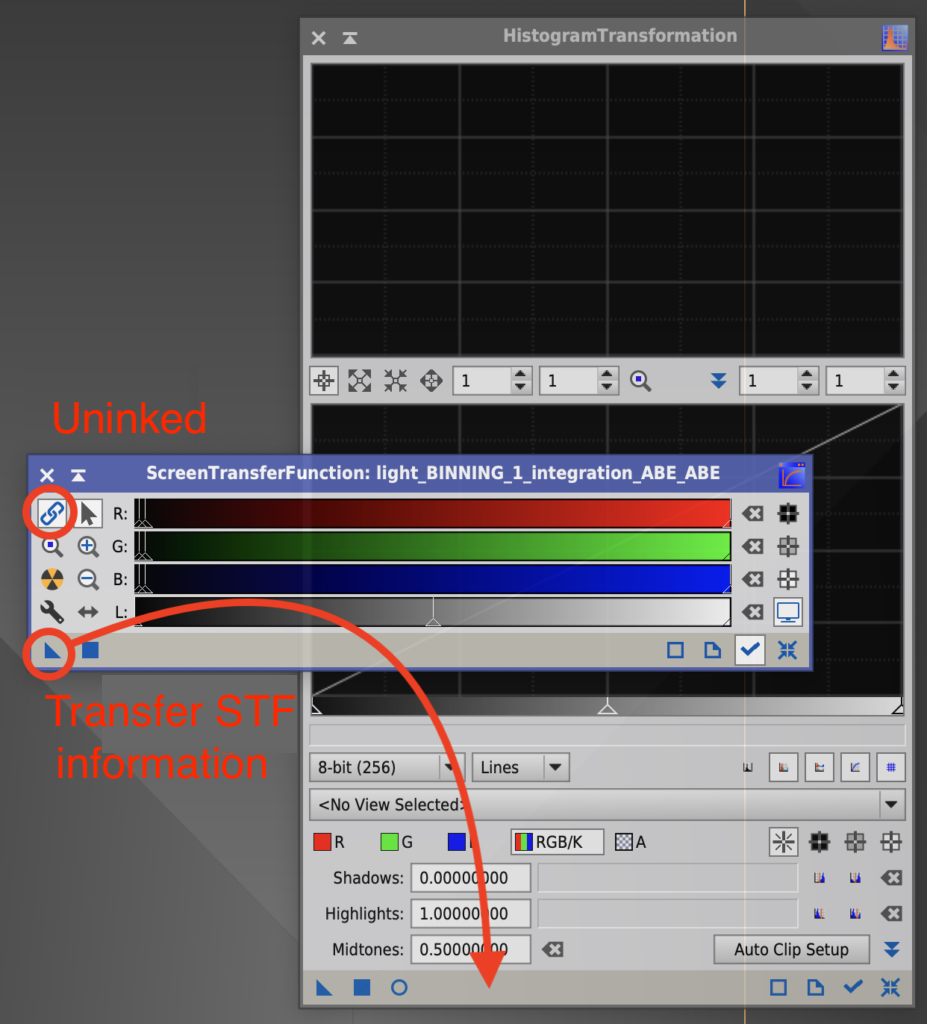
When you are done, press the crosshair reset button on the bottom right circle of the STF to turn off Auto Stretch, and press the HT ■ button to execute the process. You can also throw ▲ into the image here as well. It’s a wonder that the initially mysterious ▲ operation gradually becomes second nature to you. This is the end of the stretching process.
HDRMultiscaleTransform – Enhancements to the dynamic range
Next is HDRMultiscaleTransform, which is considered to be a magical tool. According to the tutorial, it brings out details that are hidden by bright areas. It seems to be very effective when applied to the Orion Nebula, for example.
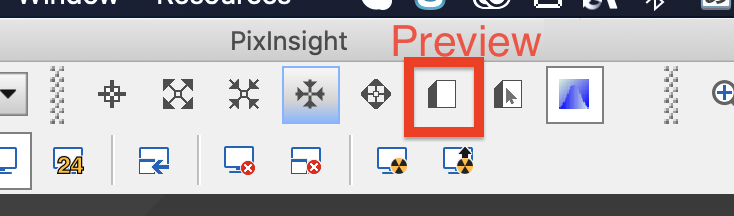
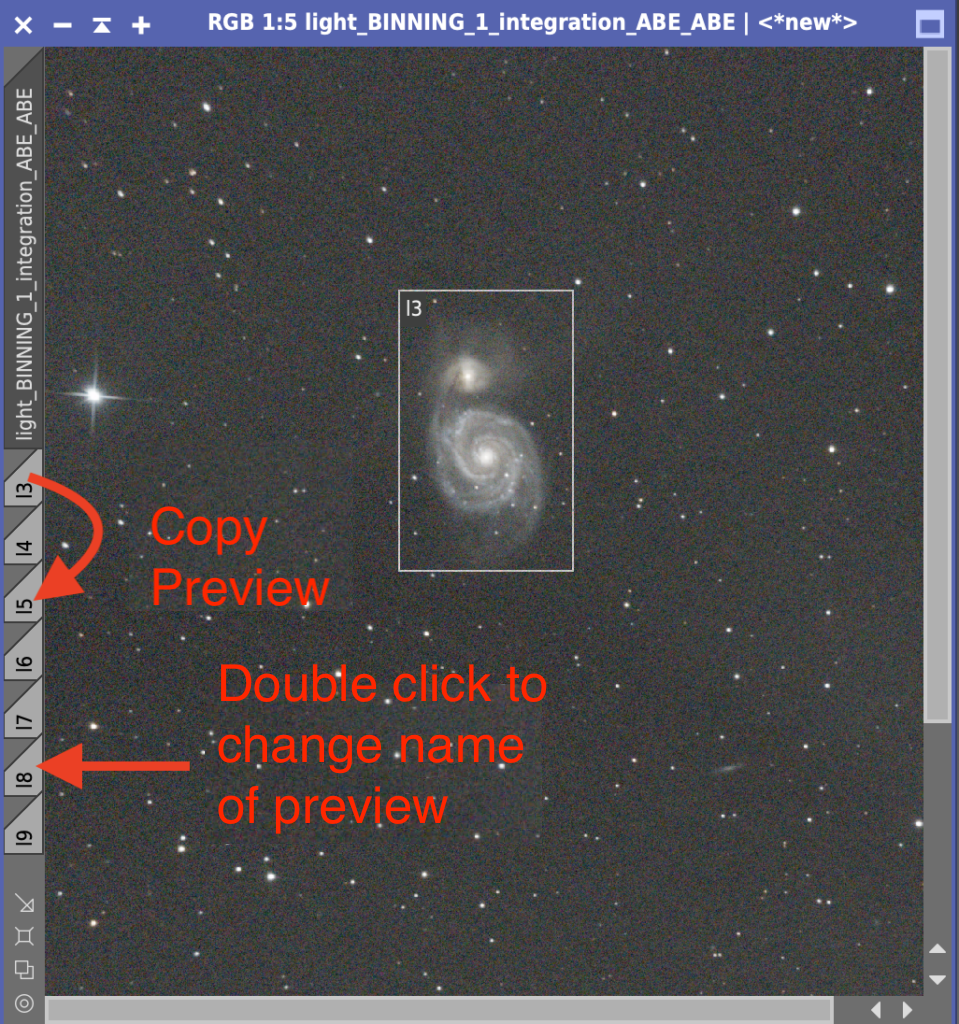
PixInsight is a trial-and-error, experimental process. In this case, we will be changing the settings several times to try out the process. To create a Preview, click the Create Preview button at the top. button at the top.
Since we were going to try different settings and compare them, we created seven enlarged Previews of the target galaxy. I gave each Preview a short name, l3 to l9, where l is “layer”.
Here I changed the number of layers to compare, and checked the Lightness mask checkbox, because the lightness mask only processes the galaxy, not the background.
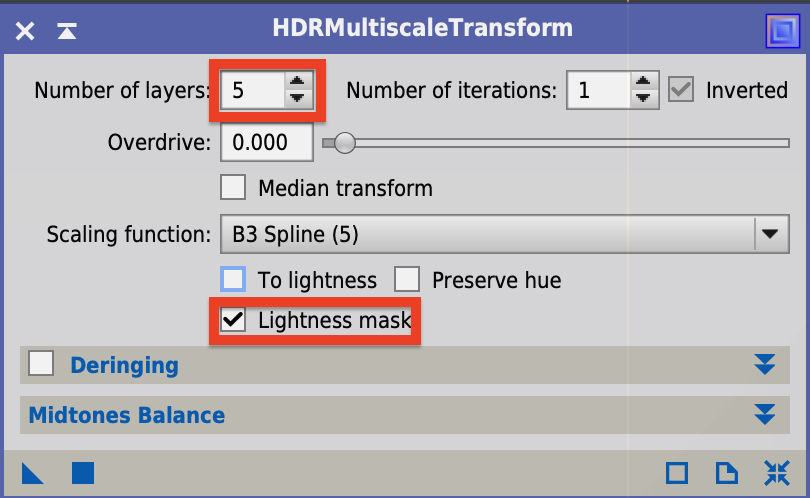
Once the settings are made, drop the ▲ mark on each Preview as usual. You get this result.


7 layers looks good. By the way, to check the effect in Preview, you can press Control+Shift+Z (I’m on a Mac, so Shift+⌘+Z) to undo/redo in Preview only. Set the determined 7 layers with HDRMultiscaleTransform and drop the ▲ mark on the original image to run it. Also, since Preview is not needed, set Preview – Delete All in the menu to delete Preview.
RangeSelection – Creating Mask
The next step is to use RangeSelection to set the mask to work only on the galaxy and only on the background; in RangeSelection, select the red circle and set the value while viewing the Realtime Preview.
Lower Limit… This is the lowest value of the mask, so it is usually left at 0.
Upper Limit… Determines the brightness of the mask. Set this value while viewing the preview screen.
Fuzziness, Smoothness… Makes the mask milder.
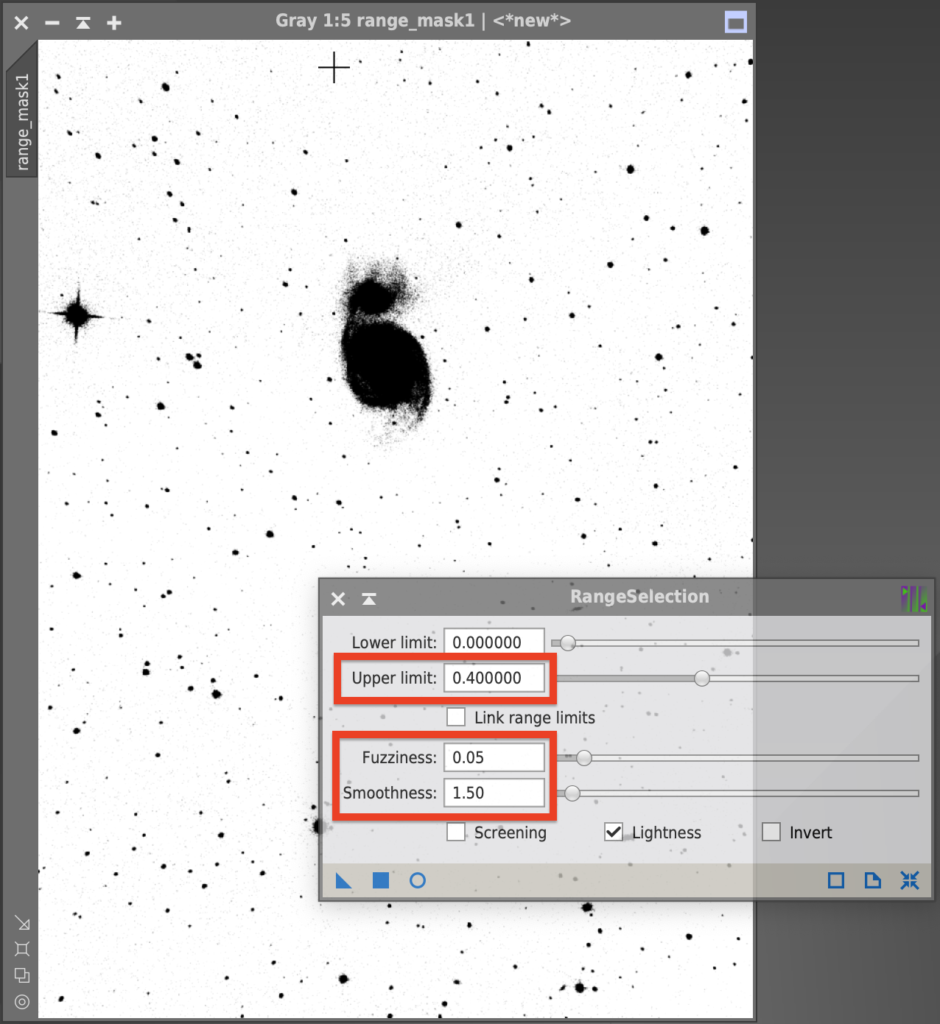
This time, I set Upper limit to 0.33, Fuzziness to 0.05, and Smoothness to 1.50. I think this is probably a sensory thing. Once the settings are made, you can mask the image by pressing the ■ button or dropping the ▲ button on the image. To set the mask, select the window of the target image and choose Select Mask from the Mask menu. The next step is to apply the process to the galaxy, so select Invert Mask from Mask to invert the mask.
CurvesTransformation (CT) – Adjusts the colors of the galaxy.
The next step is to process the galaxy using a tone curve with the mask applied. Since we have already made adjustments using PCC, we will now change the saturation by pressing the Adjust Saturation (S) button.
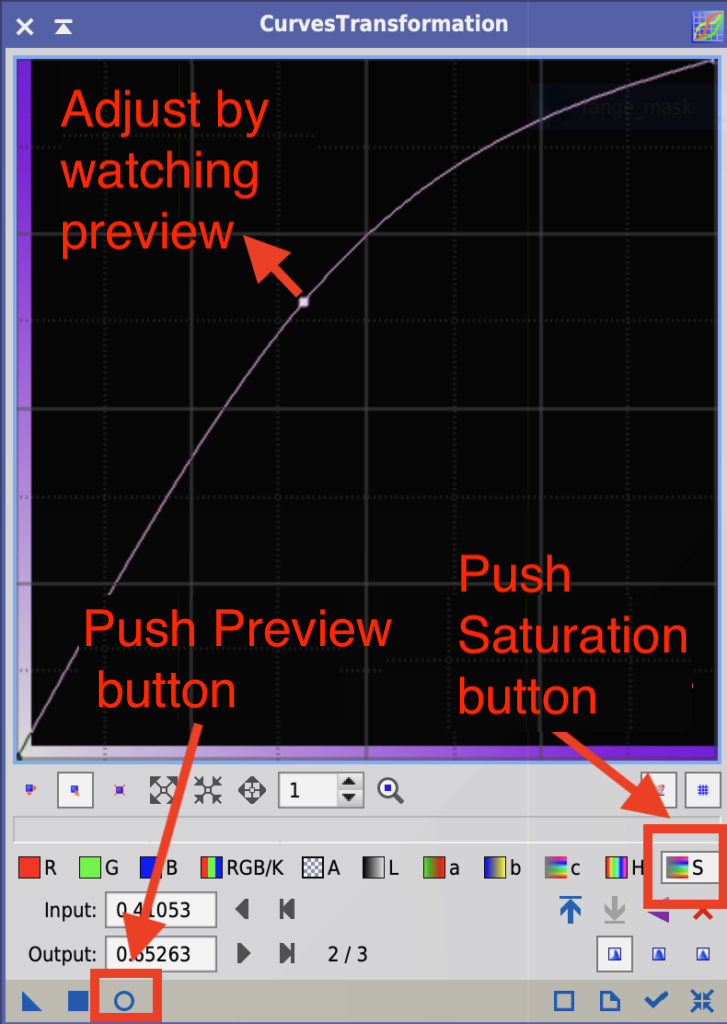
I think this is probably the most difficult process of PixInsight. I tend to make it too flashy. I know that I shouldn’t overdo it, but I can’t help holding the mouse…. The technique I use in such cases (?) is to press the (RGB/K) button.
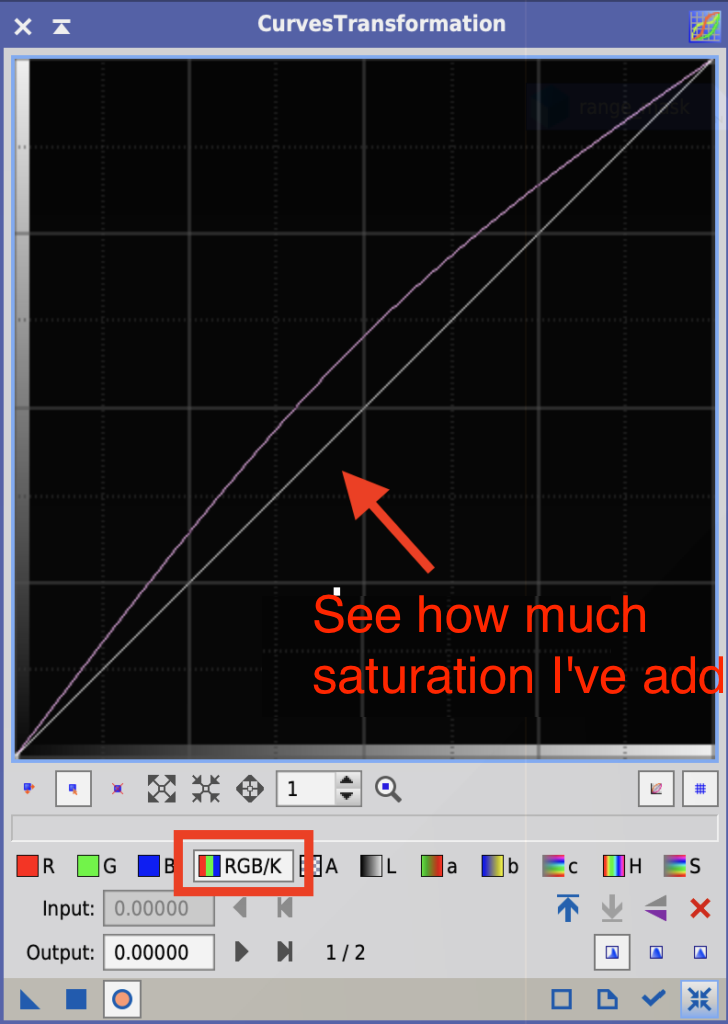
This button is normally used to adjust the RGB and monochrome grayscale, but in this case we will use it as a line to help us return to sanity; pressing RGB/K will produce a single line to show how much saturation is being applied and help us regain lost self-control.
This is how I did it. Maybe I didn’t have as much self-control as I should have… It’s a bit noisy due to the short exposure time. I’ll deal with this in the next step of noise reduction.
TGVDenoise (TGVD) – Reduction noise
ACDNR used to be the most commonly used noise reduction in PixInsight, but since the introduction of TGVD, it is said to be the most powerful!
The TGVD will be implemented by trial and error, so you will need to create many Previews, as explained in the HDRMultiscaleTransform section.
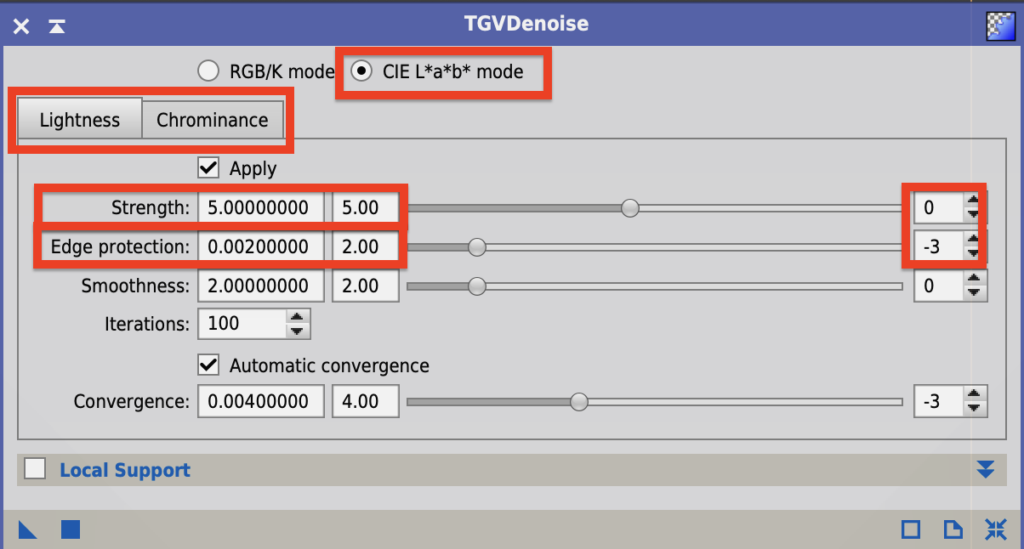
Lab* is a method of color quantification, where L represents lightness and ab represents hue and saturation. Lab* represents hue and saturation. In the non-linear processing stage, Lab* mode is selected. Note that at runtime, the image is first converted from RGB to Lab* color space, and then the processing starts. When the processing is finished, the image will be converted back to RGB.
RGB/K mode… Apply to linear images
CIE Lab* mode… Apply to non-linear images
When you select CIE Lab*, the tabs for Lightness and Chrominance will appear. Normally, you can leave both tabs as Apply.
Lightness… L*: Application to Lightness
Chrominance… a*b*: application to hue and saturation
Strength and Edge protection are the strength and edge protection of the effect. Use the slide bar to change the values. Increasing the rightmost number by 1 will increase the value by 10 times, and decreasing it by 1 will increase it by 1/10. You can also set a negative value. Setting -1 will multiply by 0.1.
Strength… Strength of the effect. Usually set to about 1/10 to 10 times the default.
Edge protection… Edge protection. The lower the value, the better the protection.
Automatic convergence also speeds up the process because it terminates when the necessary processing is completed, even if the iteration count is not reached. It is recommended that you check this box.
Since the main purpose is to remove the background noise, we will mask the galaxy by turning off Invert Mask in the Mask menu. Turn off Invert Mask in the Mask menu to make the galaxy masked, and turn off Show Mask to make it easier to see. Because of the strong background noise, I multiplied the Lightness and Chroma Strength by 10 and set them to 50 and 70 respectively. These were decided after many trials in the Preview window.
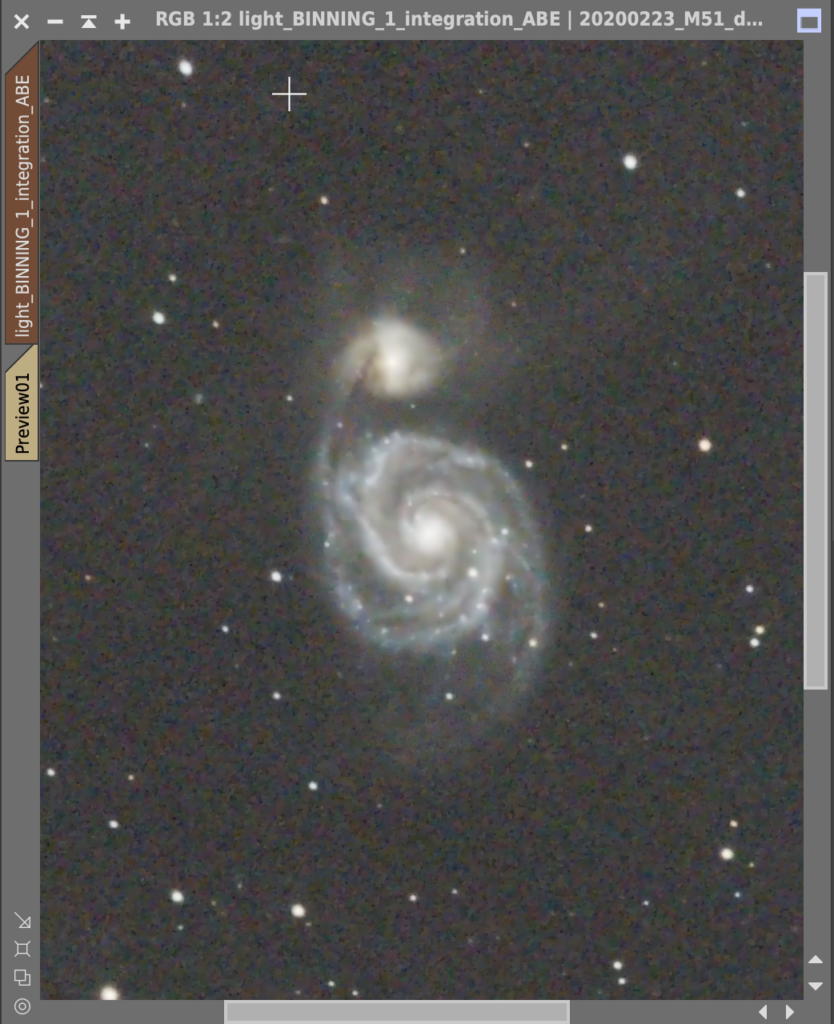
I also decided to lighten the noise in the galaxy area, so I turned on Invert Mask in the Mask menu and changed the mask from the galaxy to the background. In order not to lose the details of the galaxy, it would be better to set the Lightness and Chroma Strength back to 5, but in this case, I tried both and found that 50 and 70 were better because of the noise. Here are the results.
SCNR – Remove green noise
There is no green in the universe. The nearest OIII emission line is also blue-green, so if you see green in the image, it is probably some kind of noise. SCNR is a tool to selectively remove color noise, usually green noise. It’s a little disappointing because it’s beautiful…


HistogramTransformation (HT) – Finalizing the image
To put the finishing touches on it, launch HT. Also, turn off Enable Mask from the Mask menu to remove the mask. Here we will determine the color of the background.

Finalizing a image
Move the shadow point in the lower left corner of the graph to the right. The further to the right, the darker the background will be. I used to make the background completely black. Apollo moon photos (I highly recommend a photo book called Full Moon!). The reason is that the ISS photos and the Hubble Space Telescope photos are all black in space. However, when I traveled to Chile, the background of the wonderful starry sky I saw was not completely black. This is probably because there is air. So I thought it would be better to leave a bit of gray in the photo of us looking from the bottom of the air layer. After much deliberation, I ended up with something like this.

This is the overview flow of PixInsight!